Wednesday 26 February 2014

Final Outcome - Idea for Exhibition


Final Outcome - Idea For Exhibition


I am currently missing the fourth element (Earth), Which I will be shooting on Friday 28th February, but this is how I would like to display my images as a panel. I would also like to print them large and Possibly use the exhibition boards to create four triangles where I will hang each element on. This will hopefully bring more depth into the work and will be more of an instillation piece.


Yesterday we set up our Primary Studio Space. Primary Studios is an art space located in a disused primary school, mostly for professional artists who will hire out studios. The University has collaborated with Primary, where we had to write a proposal to be awarded one of the limited spaces.  Nine of us have been lucky to get a space and this is what we have been doing so far. I have put this photo up to show an example of the exhibitions boards, which we have also made into triangles here. This is where I came up with the idea for the exhibition.

This is how I laid out my desk at the studio space:


Monday 17 February 2014

photo shoot 5 - The Fire Element

Photo Shoot 5 - The Fire Element

In post production for this image I changed the colour balance in bridge and sharpened the image. The colour balance added warmth to the image which I then added to further in Photoshop in experimenting with the channel mixer. I increased the reds in the image which added more of a glow to the material and increased the blues to strengthen the colour. I had to clone the bands out on her wrist and some of the red material which stuck out from the sides of the material. Finally I added some curves to the overall image. This is probably the image I will use for my final images on the wall but will re edit the Raw file so when blown up large it shouldn't pixelate.


Below I experimented with the effects I could get through the aesthetics of paintings. I asked Ian to show me how to achieve the canvas type feel to the image. He told me to just play with layers by adding noise, and blurring and sharpening certain areas. We had a browse through YouTube and found this link: http://www.youtube.com/watch?v=sWv6zWtj7is
This showed you how to manually create the texture separately in Photoshop which is something I will have a look at. Unfortunately when editing my images i soon realised that all the files had converted into JPEGS when they were imported - Iphoto did this automatically. This meaning that I am going to have to go through all three photo shoots and re edit all the images. 
Fortunately for me I only need four images for my final exhibition images, therefore will focus on my four favourites. Tomorrow I am going to Ian Reynolds airbrushing workshop so learn how to properly airbrush the skin, where he said he will show me how to create the glamour glow on the skin. 


Gong Li - Photographed by Paolo Roversi


I wanted to find some work that possesses a painting like quality to it, so I have looked at Paolo Roversi. An Italian photographer working in Paris, who works both in editorial and advertising. Considering his practice which is usually focused on contemporary fashion, instead his work holds a nineteenth century era about it. Mainly focusing on portraiture his work portrays both respectful and tender elements to it, working with large-format polaroid film. I focused on this image to try and decipher how he has created this effect. there is an obvious use of blur and smudge tool in this image and a subtle use of noise to bring in texture. 

Below are some quick and non perfected experiments which I did in photoshop, these images are the ones that will not be used as I had to make quick desisions:


Saturday 15 February 2014

Make up Ideas - Fire Element Shoot

make up Ideas - Fire Element Shoot


I found examples for how I would like the make up to look in terms of colours, shading and shape. I wanted the make up to highlight the models contours to really exaggerate her cheek bones. The smokey-ness quality to the make up creates that sultry, and fierce look to represent the element of fire. 


Sunday 9 February 2014

Joyce Tenneson


Joyce Tenneson

After receiving some very positive and kind feedback off Jed Hoyland, he mentioned to look at several photographers. One of which was Joyce Tennenson which I now see is extremely relevant to my work - the use of material and the painting like quality to the images. There is something very soft, the tonal quality is just beautiful.  

Tenneson is the author of fifteen books, and has received numerous awards. Her work combines mythology and portraiture, and  is interested in analysing the acrchetypes of what it is to be human.


"I want to allow others to reveal and celebrate aspects of themselves that are usually hidden. My camera is a witness. It holds a light up for my subjects to help them feel their own essence, and gives them the courage to collaborate in the recording of these revelations." 
- Joyce Tenneson


Wednesday 5 February 2014

Photo Shoot 6 - The Water Element

Photo Shoot 6 - The Water Element 

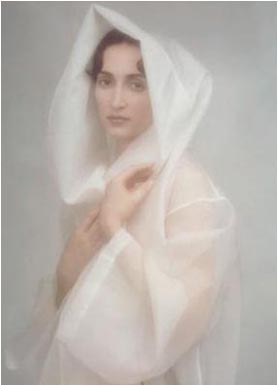
The first two images were completely experimental. The first was with help from Ian Reynolds again. This was just experimental to see how I could achieve the painting effect from the image. We looked at Joyce Tenneson and Paolo Roversi's work.

 Joyce Tenneson


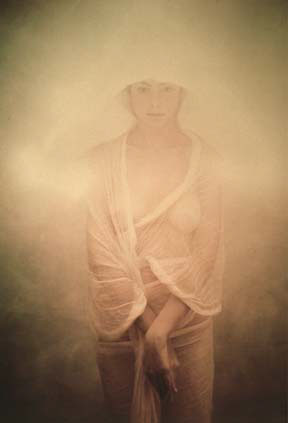
Photoshop Experiment with Ian Reynolds


This was the experiment which I had help with from Ian Reynolds. It needs a lot more adjusting but I decided I didn't like the effect that was being created. I don't like images that are highly edited in Photoshop, I like to create the art in front of the camera rather than in post production.

My own edits

Before


After

The image above was a very quickly done edit to see what it would have looked like if I filled the floor with the material. This image would look good if I was to try some graphical experiments with it.

Before

After

Here I flipped the image upside down, I did this to resemble a water droplet. I increased the blue tones and added contrast. I felt like it was more of a different take on the image and would give the viewer more reason to look and wonder.


This is one of my favourite images, I love how the material has wrapped around her body along with her beautiful composition, she looks like a statue. One of the most inconvenient parts where I went wrong was to not ask her to take her band off, therefore I had to spend hours editing it out. The above image shows the before and after of where the band was.


These two images above and below are definitely one of the images I will use for my final water element. I absolutely love how the material has turned out. I bought the blue tape from The Playhouse, Nottingham. This place is brilliant from scraps of material and you only have to pay £5 for a year pass. The one thing when speaking to Jed, he mentioned how it would have been nice to have the material come up the right side of her body to match the composition of her arms. If I have time I plan to re shoot.


This is the image I chose to get printed at The Print space in London. It was the most detailed image out of the chosen finals and I loved how the baby oil has reflected the light off her skin. This is something I wish I placed on her from the start of the shoot. I'm really proud of this shot, and if I wasn't planning to print portrait ways, this would have been one of my final images in my exhibition. 

Monday 3 February 2014

Ekaterina Belinskaya - Underwater Shoot


Ekaterina Belinskaya

Under water shoot Idea - for the water element


model - Elena Mitinskaya
fashion designer - Alisa Gagarina

In reference to my water element shoot I have found this photographer who has taken some stunning under water photographs and video footage. An underwater shoot is something I have always wanted to try but would take a ridiculous amount of planning. I wanted to analyse this to understand how she has lit it. From what I can decipher she has lit it from above - probably with a boom stand - using a large soft box to give that soft, etherial and even glow over her skin and the material. She has also used a very good camera, which has managed to capture even the tiniest bubbles which float off of her body. It is just stunning overall imagery. 


It was interesting watching the moving image as it brought a whole new depth to the work, the movement of the material was really mesmerizing. It made me think about different shapes the material can make through the environment its in. I wanted to experiment in the studio by shooting the material separately.


These have all come out a lot darker than my original edit unfortunately but it was just an experiment to see the shapes I could create with the material. I have purposely included the outside of the set and some of the arms which are in the frame as a personal record of experimentation. 


It was really interesting to see the shapes that were frozen in a moment in time. The elements are all about movement and energy but what happens when you freeze their natural 


Ryan Doco Connors - The Four Elements


Ryan Doco Connors (Portrait Photographer) // The Four Elements


"A four piece photography shoot featuring the four elements; Earth, Wind, Water and Fire. This was an interesting take on the four elements."


EARTH 


FIRE 


WATER


AIR


Ryan Doco is a creative portrait photographer and had created this project based on the four elements. I wanted to find at least on photographic example on the subject I am basing my project on. 
Quoting from his video he lists the five key points to the photo shoot;

concept
make up
styling
location 
photoshop

The gear he uses on the shoots is, as he states in his video, a 50" Wescot Apollo with a Nikon SB-600 Flash. The lens he used is an 85mm, 1.8f and the camera is a Nikon D300. He explains how the concept and the visual ideas are the most critical factors on this particular shoot and not the equipment he uses. The only external light he uses is a large soft box, shooting on 1/16 to create an even light over the model. 
After my workshop for the look book with the two photographers who came down from London they explained how the soft box is used to create a day light affect and how the beauty dish is used to create an airbrushed, clean, sharp affect - mainly used in fashion and portraiture. This is why I used mainly soft box's in my last shoot, I wanted something more softer and a more natural tonal quality from the lighting rather than something harsh.


 He explains how sketching is important information when it comes to photographing a high concept shoot and knowing your location to show to the make-up artist and stylist.

Proffessional make up artists and stylists make the world of difference on a shoot, collaborating is something I would definitely like to do in my final year.